You are in TEST mode and will see 2 posts per page to see what your blog can look like. Subscribe to TAMS Pro to remove this limitation

ENJOY CREATIVITY

CASE = Copy and Share Everything

Admire a fellow stamper’s work? Show how much you love it by CASEing it! Whether you’re a seasoned stamper or just starting out, get creative by copying and sharing everything! Stampin Up!  concept artist did just that by CASEing the It’s Your Birthday card three different ways. She created the Catching Butterflies card by using the Highland Heather Stampin’ Write Marker to make a stripped background. Pro Tip: try making your lines thicker or thinner by doing more or fewer marker strokes.Just CASE the color scheme from the It’s Your Birthday card to create our Driving By card (Gray Granite, Just Jade, Pale Papaya, and Pool Party—it’s a great color combination for any occasion)! This card is a great reminder that you don’t have to copy every detail exactly to make a great card.Need help with the layout of your next card? Look no further than the Awesome Otters card. The Stampin Up! concept artist CASEd the layout from the It’s Your Birthday card by die cutting a few Tailor Made Tags and stacking them on one another. So cool! Share your card-making skills with the rest of the world so others can learn and CASE,too!

Happy Stamping! 

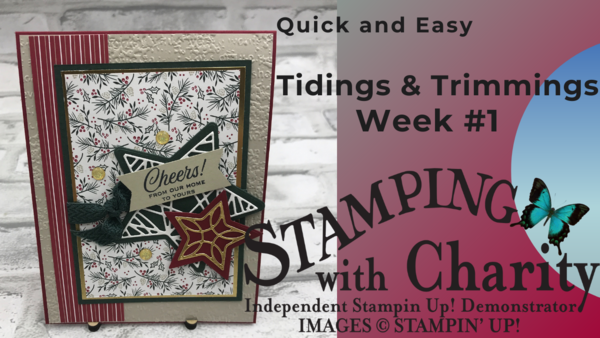
Tidings of Christmas Week # 1

Yes, I know we are in the early days of September and just getting the kids back to school... But I am not a last-minute person.  I do not like working under pressure nor creating beautiful handmade cards at the last minute.  So I will be sharing with you Christmas cards using the Tidings of Christmas Suite Collection over the next few weeks.  I hope that you enjoy these cards.  Happy Stamping! Charity 

Project Recipe:

  1. Cut a card base from Cherry Cobbler at 4-1/4" x 11" score it at 5-1/2".

  2. Cut a piece of Sahara Sand card stock at 4-1/8"x5-3/8" this was embossed using the Timeworn Embossing Folder.

  3. Cut a piece of designer series paper 1-1/4"x5-3/8", This piece of designer series paper will be adhered to the piece of Sahara Sand cardstock using your favorite adhesive. I prefer Multi-purpose glue for any layers that are embossed. It is approximately 1/4" from the edge of the cardstock.

  4. Now you can adhere the Sahara Sand layer down to the card base. Again I would use Multi-purpose glue for a strong bond.

  5. Cut a piece of Evening Evergreen 3-1/4"x4-1/2". I would then die cut the Evening Evergreen star out of the center of this piece as you will be covering it up.

  6. Cut a layer 3-1/8x 4-3/8 from Gold Foil Sheet. Again I would cut out the gold star from this piece of Foil Sheet so I can get more out of my paper. Before you die cut the star out be sure to add an adhesive sheet to the back it will make adhering this to the Cherry Cobbler small star so much easier. This layer again will be covered up by the final layer and you will not see that you cut out a star.

  7. Cut a piece of designer series paper 3x4-1/4" this will layer on top of the Gold Foil Sheet and the Evening Evergreen. Be sure that when you add your adhesive try to keep it on the edges for that the area that you die cut out will not show.

  8. Now die cut the small star in Cherry Cobbler. And the detailed star from Basic White Cardstock. I would add the adhesive sheet to the back of a piece of basic white before you die cut. It will make Adhering them to the coordinating solid star so much easier.

  9. I would then adhere the layers of Evening Evergreen, Gold Foil, and Designer Series paper to each other and then to the card base. But before you adhere to the card base be sure that you tie your ribbon on. I used some glue dots to hold the ribbon in the position that I wanted it. Then the entire layer is glued down to the card front. It is approximately 1/4" from the edge of the card and 1/2" from the top.

  10. Adhere your star using your favorite adhesive on the Evening Evergreen and then pop up the Cherry Cobbler star using Stampin Dimensionals.

  11. I stamped my sentiment on a scrap piece of Sahara Sand cardstock in Memento Ink. Then I banner cut the ends. And popped this up using Stampin Dimensionals. For the finishing touch on the front of the card, I added some of the Retired Gold Enamel Dots but you could easily replace them with the current Gilded Gems and it would look just beautiful.

  12. To complete the card I cut an insert at 4"x5-1/4 from Sahara Sand Cardstock and add a scrap of designer series paper along the edge, Don't forget to add some designer series paper to your envelope flap and you will have completed the look to your handmade card. Happy Stamping! Charity

Click on the image below to watch the YouTube Video on how to make this card.